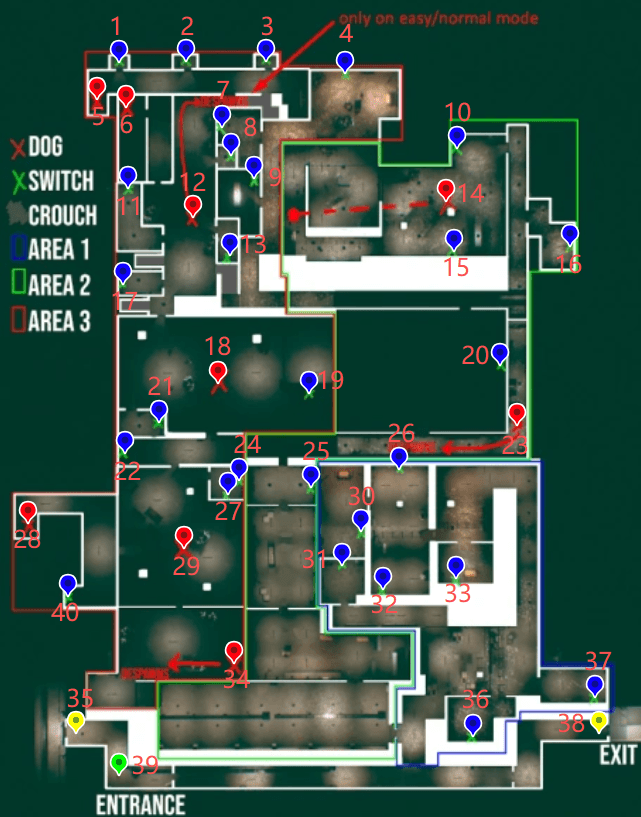
1: Breaker
Breaker.
2: Breaker
Breaker.
3: Breaker
Breaker.
4: Breaker
Breaker.
5: Hound
Hound.
6: Hound
Hound.
7: Breaker
Breaker.
8: Breaker
Breaker.
9: Breaker
Breaker.
10 Breaker
Breaker.
11: Breaker
Breaker.
12: Hound
Hound.
13: Breaker
Breaker.
14: Hound
Hound.
15: Breaker
Breaker.
16: Breaker
Breaker.
17: Breaker
Breaker.
18: Hound
Hound.
19: Breaker
Breaker.
20: Breaker
Breaker.
21: Breaker
Breaker.
22: Breaker
Breaker.
23: Hound
Hound.
24: Breaker
Breaker.
25: Breaker
Breaker.
26: Breaker
Breaker.
27: Breaker
Breaker.
28: Hound
Hound.
29: Hound
Hound.
30: Breaker
Breaker.
31: Breaker
Breaker.
32: Breaker
Breaker.
33: Breaker
Breaker.
34: Hound
Hound.
35: Exit to Level 2
Exit to Level 2.
36: Breaker
Breaker.
37: Breaker
Breaker.
38: Exit to Level 4
Exit to Level 4.
39: Player Spawn
Player Spawn.
40: Breaker
Breaker.
Map Overview
This map shows the complete layout of Level 3 (Electrical Station), a large abandoned electrical station with three dangerous zones. Players must find and activate breakers (fuse boxes) in each zone to unlock the exit to Level 4. For the full objective order and survival strategy, follow Escape the Backrooms: Level 3.
Zones
Level 3 is divided into three zones, each becoming progressively more dangerous:
- East Substation (Zone 1): The first zone. Contains 3 simple fuse boxes that need to be activated. Relatively safe but dark.
- West Substation (Zone 2): The second zone. Much darker and more dangerous than Zone 1. Contains 3 fuse boxes and 2 Hounds. Use flashlight to blind Hounds.
- Generator (Zone 3): The most dangerous zone. Very dark, contains puzzle-based fuse boxes (Triway and Colored Wires), Hounds, and electric puddles. Contains 3 fuse boxes.
Breakers (Fuse Boxes)
Level 3 contains 9 fuse boxes total that need to be activated:
- Zone 1: 3 simple switch-based fuse boxes
- Zone 2: 3 simple switch-based fuse boxes
- Zone 3: 3 puzzle-based fuse boxes (Triway and Colored Wires puzzles)
All breakers must be activated to unlock the exit to Level 4.
Hound Entities
Hounds patrol the level, especially in Zone 2 and Zone 3. Use your flashlight to blind them and escape. Be cautious when navigating near these areas.
Hazards
- Electric Puddles: Found only in Zone 3 (Generator). These electrified puddles will kill you instantly if stepped in. Simply avoid stepping in them.
- Darkness: The level is very dark, especially in Zone 2 and Zone 3. Use your flashlight to navigate.
Objective
Find and activate all 9 fuse boxes across the three zones. Zone 1 and Zone 2 have simple switch-based fuse boxes, while Zone 3 has puzzle-based fuse boxes that require solving Triway or Colored Wires puzzles.
Level Information
Category: Early Game
Survival Difficulty: Class 4 - Severe Danger
Sanity Danger: Class 2 - Moderate Sanity Risk
Mechanic: Puzzle, Exploration, Breaker Activation, Entity Avoidance
Entities: Hound (9 total)
Items: Almond Water, Energy Bar, Flashlight
Warning: The level is dark and dangerous. Use your flashlight to navigate and blind Hounds. Avoid electric puddles in Zone 3.